Image Map
Showing posts with label tutorial. Show all posts

Saturday, December 8, 2012

Day 8: Cookie Gifting Ideas

Ok so day 8 is a little late! I participated in my first craft sale on Saturday, and I was a little wiped out so I took the weekend to revive myself! But I have a few gift ideas for all those cookies your have been baking like crazy!

You can of course bake lots of cookies and make a cookie plate. If you plan on giving the plate I'd recommend a quick trip to your local Sally Ann, to find an inexpensive one off plate that would make the perfect setting to your cookies! Tins also work extremely well, and you can find them at the dollar store for... $1! Or if you're feeling crafty you can try this little trick, which I have posted before:
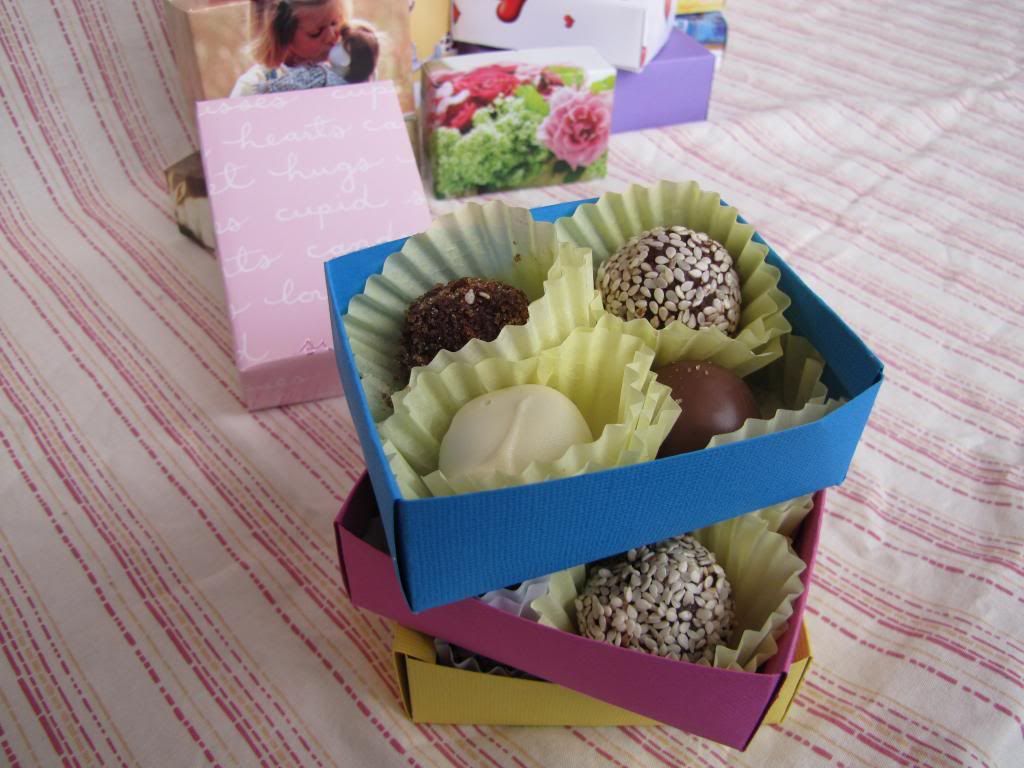
 
Up-cycled Christmas Cards! You can find the tutorial here if you'd like to know exactly how to make these sweet little boxes.

Or, if you feel that baking all those cookies yourself might be a little too much, then try gifting one of these cute little jars of almost baked goods. I say almost because the recipient will have to add a couple ingredients, and mix, spoon and bake themselves. But there sure is something about layers in a glass jar that would please just about anyone :)
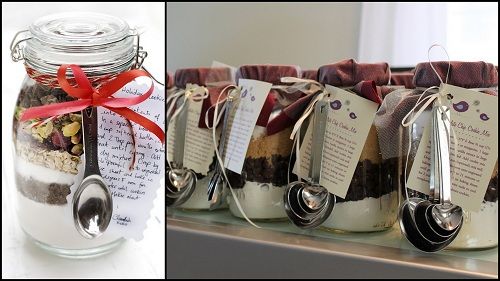
sources here and here
For lots of delicious jar cookie recipes check out this page. I'm sure you can find something for everyone on your list!

There's a few ideas to get you started! And don't forget, you can still link-up any cookie recipes if you'd like to share some cookie love :)

Stay tuned, tomorrow we start the squares portion of the countdown!

Happy Baking
xox


Saturday, February 11, 2012

From the Stash: Plastic Bag Storage Tutorial & New Project

A couple weeks ago I shared my plans to solve the problem of our over flowing bottom kitchen drawer. It is amazing, even though we don't get plastic bags when grocery shopping and often say no when asked if we would like them, how many we actually have!
So this drawer is now a much tidier place, and I think is going to become a much more convenient place to keep our dish clothes and towels. :)

To find out how to make your own plastic bag holder click here, or go to the tutorials page and select the appropriate link. You can download or print the tutorial. And if you make your own please link back here, I'd love to see them!

I have a few projects up my sleeve for this coming week, but it is going to be a busy one, so I will see what I have time for and share towards the end of the week! Have you entered the giveaway yet? You only have a couple more hours :)

xox

Friday, July 22, 2011

S'more Love! (a delicious DIY)

So earlier this week I blogged about a trip I took for work. And in the evening we had a chance to relax, sit by a fire and cook some s'mores! What are s'mores you ask? Well as a blogger I made sure to take photographic evidence of the process, so could I share it DIY style with you all! :) If anyone is planning a camping trip this weekend, here is a great way to spend your evening!

Step 1:
Make sure you have all the necessary ingredients:
- graham crackers
- marshmallows
- chocolate (jersey/dairy milk works well)
- tin foil (for added gooeyness)

Step 2:
You have to find yourself a good marshmallow stick, and with a sharp knife make one end pointed. However, in provincial parks we are not allowed to pick up fallen wood, so I used kindling sawed down to the appropriate size (thank goodness for my knife!), and some old wiener roasters that my mom gave me.

Steps 3-5:
Lay out your graham crackers, add a piece of chocolate, and I usually put this close to the fire on/in tinfoil to melt the chocolate.
 
 
Step 6:
Carefully put your marshmallow on the stick, and you want to roast it close to hot coals (not flames), until it is golden brown and bubbly. Try to avoid to temptation to eat it! Or eat it and roast another :)
 
Step 7:
Place the golden marshmallow on the graham cracker with the melted chocolate, and top with a second graham cracker.
 
Step 8:
Enjoy! Try not to get melted chocolate and sticky marshmallow everywhere - but believe me it can be difficult to avoid!
Happy camping, and s'more making! And thanks very much to my friend Kathleen for her assistance with the photography!

What is your favourite treat while camping?
xox

Sunday, July 10, 2011

In the Garden: Fencing, DIY style

I can sometimes be a bit of challenge to get everything growing the direction you want in a garden. So here is a little tutorial that will help your peas (or other viney plants) reach for the sky!

You will need:
Garden Gloves, Sticks (fairly straight), twine, scissors, and throw in a couple tomato cages for good measure!

Step #1: Lay out your four longest sticks parallel to each other.
Step #2:
Make sure that the bottoms of your sticks are (mostly) lined up, and break off any twigs at the bottom that will get in the way when pushing into the earth.


Step #3:
Lay your cross pieces on the support posts. You can do any design you like. I would just suggest that you have at least two cross pieces that cross all four support posts.

Step #4:
Using your scissors cut the twine into pieces approximately 12" (30cm). Cut as many pieces as you think you will need to keep your fence sturdy.

Step #5:
Using 1 piece of twine at a time, tie the sticks together at the cross points.
 1. Lay the twine from corner to corner.
 2. Cross the ends on the other side of the stick.
 3. Pull the ends of the twine so they are 90 degrees from where they crossed the stick. And pull around opposite corners to the other side.
 4. Tie tightly in place.
Confused? Look at the photo below :)

Step #6:
Push firmly into the garden directly above where you planted peas, beans, tomatoes or anything that needs to climb or be tied up. My little peas had already grown a little so I had to carefully untangle them, and wrap then around the posts.
 
I love those little curly cues, so cute! And if you happen to have a couple tomato cages around they will work instead of a fence. I just have a lot of old maples in my garden, and they tend to drop many sticks - good for fence making and fires!
 
The cages also work well to support your tomatoes. Hehe obvious, I know!

Friday, March 11, 2011

Weekend Workshop - Message Board

Recently I made a trip to the dollar store to get some craft supplies. Similar to my trip to the thrift store I wasn't sure what I was looking for, but I knew that I would know when I saw it. I ended up with all sorts of things, a couple of which were a roll of adhesive blackboard, and a package of corkboard. At home I had a multitude of frames and knew I could come up with something neat.
And here is what my creative juices developed:
A unique message board, with blackboard, corkboard and personal photos!
To find out how to make this yourself, go to the tutorials page and follow the link!


Monday, February 14, 2011

Homemade Love

Happy Valentine’s Day everyone! An exciting post today as Crystal (from Crafty Ave) and I created our own Valentine’s treats, and even made our own boxes to store and gift the tasty indulgences. 


 They look dangerously delectable don’t they!? We made:

For the first three recipes please click on the links above, you can find them over at Crafty Ave. And for the Maple Fudge Walnuts, I found this recipe in the Canadian Living Special Issue “Home for the Holdiays”, Fall 2008.

Maple Fudge Walnuts

4 cups  walnut halves, broken
1 cup   packed brown sugar
½ cup whipping cream
¼ cup  maple syrup
1 tbsp  butter
½ tsp   salt
½ tsp   maple extract
 
Roast nuts, on a lined baking sheet, in 350˚F oven until fragrant and golden, 12 to 15 minutes (be careful with this part, they can go from not cooked to burnt very quickly!); transfer to large bowl.

Meanwhile, in large saucepan, bring sugar, cream, and maple syrup to a boil, and boil until reduced to 1¼ cups (8 minutes, or I say until the liquid is quick thick and sugary). Remove from heat, stir in butter until melted, add salt and maple extract.

Pour syrup mixture over nuts; toss to coat. Spread on a parchment-lined baking sheet. Let cool. Break into pieces. (Store in an air-tight container, or freeze for longer storage)

People give and get so many cards every year, I like that this craft re-purposes these cards instead of sending them to the recycling plant. Also, the re-used card handmade boxes can be stored and re-used over and over again, for future tasty treats and small gift giving! To learn how to make them yourself, click here.


Enjoy, and try not to overindulge!