Image Map
Showing posts with label DIY. Show all posts

Monday, January 25, 2016

DIY Natural Baby Wipes

I've been working recently to rid our home of toxins by replacing personal items we use every day, with homemade natural and healthy versions. I have been replacing items for quite a while, but for time sake I chose to go with natural and safe options available from reputable companies. In the case of baby wipes I really love the Honest Company, but ordering from them regularly was getting a little pricey, and as one of my main goals this year is to spend less I was looking for another option. My cousin mentioned that Wellness Mama had a great blog, with a super simple wipes recipe so I checked it out. I decided to try it myself and was super impressed! I have tweaked the recipe a little for our needs and what I already have in the house.

DIY Natural Baby Wipes Recipe

1 1/3 cup  boiled water, cooled slightly (or distilled if you have it)
2 tsp         Pure Witch Hazel Extract
2 tsp         Aloe Vera Juice
1 1/2 tsp   Castile Soap
12 drops   Essential Oils (I use Lavender, Melaluca, and Orange)
1 roll        Heavy Duty Paper Towels (cheap ones do not work well! :))

DIY Natural Baby Wipes Method

Using a sharp knife cut the paper towel in half. Then accordion fold one half of the paper towel roll and place into a clean and dry reused wipes container.
Combine all the ingredients listed above in a glass jar and mix gently. Then, gently pour the liquid over the paper towels in the wipe container. You may have to flip the pile of paper towels over part way through to ensure the bottom ones get soaked through.
Pull the end of the paper towel up through the hole in the wipes container and use as often as necessary!
This recipe took me only about 10minutes from start to finish. It is super simple and very cost effective. I also love that I know all of the ingredients that are added to the paper towels that will be going on my kids' skin. Wellness Mama has some great points about the scary ingredients that are included in conventional wipes brands, even the 'natural' versions.

Have you ventured into making your own personal care products? I'd love to hear what you make and which recipes you love!!!

Check back tomorrow for an update of our first day of the Smoothie Challenge!!
xox
Margot

Friday, January 22, 2016

Staying on top of the Cold Weather Season

Winter has finally settled in, with all the snow, and cold, and blustery winds that come with it. We are trying our best to stay on top of the cold weather season this year, and I thought I would share some of the ways we are doing so!
I have made a point this winter to start every day with Greens. Sometimes they are in a smoothie, sometimes just mixed in a glass of water. I love these Greens because they offer 38 herbs and nutrient rich 'superfoods', 8+ servings of fruits and veggies in each glass, they help promote an alkalized environment in the body, and they provide amazing probiotic support for optimum digestive health.
Did you know that disease thrives in an acidic environment? And that promoting healthy gut flora with the use of probiotics is  great way to improve immune health?
I made a chest rub for the kids. To help ease congestion and calm them to ensure they get a good sleep at night. It is super simple, and takes only  few minutes to whip up:
2tbsp   Coconut oil (unrefined)
1tsp     Apricot oil (or Almond)
5drops Tea Tree essential oil
5drops Lemon essential oil
3drops Lavender essential oil (optional)
3drops Copaiba essential oil (optional)
Warm the coconut oil in a glass jar until it is liquid, add the apricot oil, allow mixture to cool slightly. Add all the essential oils and mix. Rub on chest nightly before bed.
Add 10 drops of Thieves essential oil to a roller bottle, and fill to the top with Apricot oil (or any other carrier oil). Apply to the bottoms of your feet morning and night to help give your immune system a little boost and enjoy the pleasant scent! ;) I like to dilute it simply to make the oil stretch farther, even diluted it still has great benefits!
Finally, we've been diffusing oils regularly. As you can see above there are many benefits to diffusing oils. The benefits will depend on which oils you choose to diffuse. This time of year I love to diffuse Thieves, Purification, Lavender, Lemon or my personal favourite Northern Lights Black Spruce.

What do you do to make it through the winter season?
xox
Margot

Monday, January 18, 2016

Foaming Hand Soap

Many people wonder why I would bother to go to the 'trouble' of making my own cleaning and body care products. I have been dabbling in homemade products for about 6 years, but never committed fully to replacing all of the products in our home. In the past I replaced many of the regular products with those from The Honest Company, it is great company and I love the products, but ordering products every 5-6weeks was getting expensive. I knew there was a better way. Since I joined Young Living I have been replacing traditional solutions to ailments and cleaning with essential oils. Making our home and bodies healthier.
I am making about 1 product day right now. So it isn't time consuming and you use really cost effective ingredients (and a small amount of them). And so far I am over the moon with the results!

DIY Foaming Hand Soap

12oz       Previously boiled water, cooled (or distilled if you have it)
2tbsp      Castile Soap
1/2tsp     Olive Oil (optional*)
5-8drops Essential Oils

Add the water to the jug, leaving about 1" of space from the top. Then add the Castile Soap, Olive Oil and Essential Oils (I used 3 drops Thieves, and 5 Orange, you can use any scent you like). Shake gently to combine.

*The Olive Oil will help keep your pump working well, and make your Essential Oils last longer but isn't necessary.

Have you made your own soap? What oils did you use?

xox
Margot

Saturday, January 16, 2016

Reaching Goals with DIY Laundry Detergent

This year one of my biggest goals is to crush some debt! I have been working on spending less for a long time, and really thinking about items before I purchase them. But I want to do more. So I decided to take a look at some of the products that we use daily, and find ways to make them more affordable. The great thing about making these products at home is they are not only easy on your wallet, but they are so much better for you and your family than the conventional products.
DIY Laundry Detergent

1 cup      Castile Soap
1 cup      Sea Salt
3/4 cup   Baking Soda
6 L         Warm Water
30 drops Essential Oils (your choice, Purification, Thieves, Lemon, Lavender, Citrus Fresh all good options)

Using an up-cycled large detergent jug, measure the sea salt and baking soda and combine with water and pour into jug. Measure soap, add Essential Oils (I chose to use 10 drops each of Purification, Lavender and Lemon), and pour into the jug. Add the remaining water and shake jug gently. Use about 1/2 cup detergent for a large load of laundry.

This simple recipe works so well, smells great, and cost me less than $7 to make a large jug. This is kind of amazing, and I can't believe I didn't start doing it sooner!

Have you replaced any of the items in your home?
xox
Margot

Wednesday, March 18, 2015

Come and Hook!

This weekend I will be at the 5th Annual Peterborough Fibre Arts Festival. This is my third year attending this festival and I love it more every year. It is so nice to chat with other fibre artists and organizations, and share my love of rug-hooking with the event visitors! I always have a demo table set-up where anyone can sit down and try their hand at hooking, and I will of course have a variety of rug-hooking kits and some others supplies.

 
Hope to see you there!
xox
Margot

Wednesday, October 8, 2014

Pumpkin Spice


I've been working away lately to create kits. Apart from the Espanola Fibre Arts Festival in two weeks, I am teaching a beginner workshop near home tomorrow, at a sweet yarn shop in Peterborough. They offer all kinds of classes in knitting, and some in rug-hooking and needle felting - some with guest teachers (like me;). For more info click here. I meant to share the news about this workshop earlier on the blog, but last I heard it is full. If you are interested in a beginner workshop in the future feel free to let me know, I am in the process of developing a 'traveling' workshop to small groups of aspiring hookers :).
Kits include instructions, design on burlap, small hoop, wool*, rug-hook* (*optional)
Here are a few photos of the coaster kits I have available, and will be working to get up in my etsy shop soon :)
Pumpkin Spice // Tweet Tweet // Sweetheart // Flower Power
The coaster kits finish to approx 4"x4", which is the perfect size for a hot cup of tea. And as it states above the wool and hook are optional so if you prefer to choose your own colours, you can purchase wool separately - or use some of those yarn scraps you have laying around home.

Hope your fall is fabulous so far - less than 4 weeks to due date :) So much to do so little time!
xox
Margot

Tuesday, January 17, 2012

Mat Pants, not Fat Pants

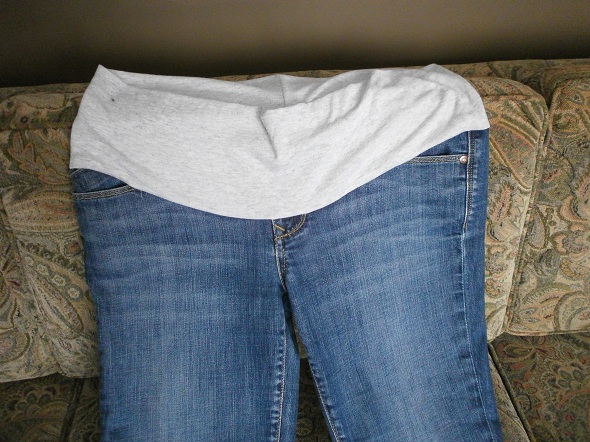
I made a decision around the time I found out I was pregnant, not to spend all my hard earned money on MAT clothes. Part of the reason being that my hard earned money is already allocated to another place, and the other part is that I think that maternity clothes are way overpriced for the amount of time you wear them (kind of like wedding dresses, and I already gave in and bought one of those).

So as I mentioned here, I chose to shop at the local salvation army to see if I could find a few pairs of pants that (almost) fit, to alter into maternity pants. I was lucky enough to find one pair of jeans and two pairs of work appropriate dress pants for a total of $13!
I had a pretty good idea of was going to make the transformation, but just to be sure I looked around the interwebs for some advice. I found a few really good tutorials here, here and here, which confirmed the plans I already had to basically cut off the waist/zipper and add jersey with stretch (or in my case my brother's old t-shirt).
I am pretty happy with the outcome, and they still have some growing room (we know I am going to get bigger than I already am!).
I will share the other two pairs of pants, when I alter them, and then along with some clothes I already have, and some borrowed MAT clothes from friends I should be all set for the next few months!

So far this has been a pretty amazing experience, and I'm excited for the rest of it! I hope you're all having a good week. I'll be checking in again soon!
xox

Sunday, October 23, 2011

Blog Party: Cheap and Easy Hallowe'en Decor

I'm guest-posting over at Ashley's Blog Party today, on After Nine to Five. I'm sharing a few Spooky Secrets to liven up your home for the upcoming Hallowe'en holiday.

A simple, inexpensive and tasty way to bring some colour to your table. Be sure to hop on over to Ashley's blog to see the tips, tricks and display in full!
xox

Friday, July 22, 2011

S'more Love! (a delicious DIY)

So earlier this week I blogged about a trip I took for work. And in the evening we had a chance to relax, sit by a fire and cook some s'mores! What are s'mores you ask? Well as a blogger I made sure to take photographic evidence of the process, so could I share it DIY style with you all! :) If anyone is planning a camping trip this weekend, here is a great way to spend your evening!

Step 1:
Make sure you have all the necessary ingredients:
- graham crackers
- marshmallows
- chocolate (jersey/dairy milk works well)
- tin foil (for added gooeyness)

Step 2:
You have to find yourself a good marshmallow stick, and with a sharp knife make one end pointed. However, in provincial parks we are not allowed to pick up fallen wood, so I used kindling sawed down to the appropriate size (thank goodness for my knife!), and some old wiener roasters that my mom gave me.

Steps 3-5:
Lay out your graham crackers, add a piece of chocolate, and I usually put this close to the fire on/in tinfoil to melt the chocolate.
 
 
Step 6:
Carefully put your marshmallow on the stick, and you want to roast it close to hot coals (not flames), until it is golden brown and bubbly. Try to avoid to temptation to eat it! Or eat it and roast another :)
 
Step 7:
Place the golden marshmallow on the graham cracker with the melted chocolate, and top with a second graham cracker.
 
Step 8:
Enjoy! Try not to get melted chocolate and sticky marshmallow everywhere - but believe me it can be difficult to avoid!
Happy camping, and s'more making! And thanks very much to my friend Kathleen for her assistance with the photography!

What is your favourite treat while camping?
xox

Sunday, July 10, 2011

In the Garden: Fencing, DIY style

I can sometimes be a bit of challenge to get everything growing the direction you want in a garden. So here is a little tutorial that will help your peas (or other viney plants) reach for the sky!

You will need:
Garden Gloves, Sticks (fairly straight), twine, scissors, and throw in a couple tomato cages for good measure!

Step #1: Lay out your four longest sticks parallel to each other.
Step #2:
Make sure that the bottoms of your sticks are (mostly) lined up, and break off any twigs at the bottom that will get in the way when pushing into the earth.


Step #3:
Lay your cross pieces on the support posts. You can do any design you like. I would just suggest that you have at least two cross pieces that cross all four support posts.

Step #4:
Using your scissors cut the twine into pieces approximately 12" (30cm). Cut as many pieces as you think you will need to keep your fence sturdy.

Step #5:
Using 1 piece of twine at a time, tie the sticks together at the cross points.
 1. Lay the twine from corner to corner.
 2. Cross the ends on the other side of the stick.
 3. Pull the ends of the twine so they are 90 degrees from where they crossed the stick. And pull around opposite corners to the other side.
 4. Tie tightly in place.
Confused? Look at the photo below :)

Step #6:
Push firmly into the garden directly above where you planted peas, beans, tomatoes or anything that needs to climb or be tied up. My little peas had already grown a little so I had to carefully untangle them, and wrap then around the posts.
 
I love those little curly cues, so cute! And if you happen to have a couple tomato cages around they will work instead of a fence. I just have a lot of old maples in my garden, and they tend to drop many sticks - good for fence making and fires!
 
The cages also work well to support your tomatoes. Hehe obvious, I know!

Friday, April 22, 2011

Plant a Tree!

Earlier this week I went into town with Crsytal, loo, and beri. The municipality was giving out baby trees to celebrate Earth Day. Crystal and I each decided to take one home. Also, last Saturday Sarah posted her third 'Grow Challenge'. I was hoping to make something fun, like play-dough, because my mom and I used to make it when I was little. However, there just hasn't been the time, and Reggie and I are headed to the cottage this afternoon for a couple days. And then I remembered, when I was a little girl the school I attended often gave out trees, or tree seeds packed in peat. And then the memory train started to roll.. My mother loves to garden and she was always working in the garden. I had some interest when I was young, and one year she let me have my own vegetable garden. I seem to recall eating carrots before they were big enough to really be carrots. And since it is (supposed to be) Spring, I thought it appropriate that my creation be planting the tree that I brought home. Wow, that was quite the explanation.

So in celebration of Spring, Earth Day, Sarah's Grow Challenge and my fond memories: How to Plant a Tree :)

I decided to plant the tree in a pot, just until it gets a little bigger and I find the perfect location in the yard. Or, I might perhaps leave it as a potted tree and use it as a Christmas Tree!
If there is no hole in your pot, line the bottom with small rocks, coniferous trees like well drained soil, and this will help the roots from sitting in water and rotting.
Add about 1/3 of the total soil required and a little water, and then holding the tree gently add the remaining soil until the roots are covered completely.
Press the soil down gently, and then water thoroughly.
This is a very small pot for a tree. It was all I had on hand at the time, I will likely re-pot it in a week or so.

How are you celebrating Earth Day?

Friday, April 15, 2011

Weekend Workshop - Storage Container

With only a week left before earth day here is a little craft that you can do to keep some of your small crafting supplies organized. The materials are things you can likely find around your house, and have been re-used or re-purposed.

Go to the tutorials page to find out how to make this container, and create greener storage for your crafting supplies and accessories! :)