Image Map
Showing posts with label cookies. Show all posts

Monday, December 17, 2012

Day 17: Snickerdoodles with Megan

I know what you're thinking, we've already seen this recipe! Well this is from a different guest baker, and it was just too cute to pass up. Take a look and see how Megan and her little helper make these tasty treats :)
----------------------------------------------------------
Merry Christmas!! 
My name is Megan from {And here's to you, Mrs. Robinson}. I'm really excited to share one of my favorite cookie recipes with you all today for Margot's Christmas Cookie Countdown. I always loved making Snickerdoodles with my mom and being her special helper to roll the dough in the cinnamon & sugar. Now I love that I can pass on the tradition with my son and we can make those memories together.  

This recipe is adapted from the Lion House Cookbook.

INGREDIENTS:

1/2 cup granulated sugar
1 1/4 tsp. cinnamon
1 cup butter, softened
2 1/2 cups sugar
4 eggs
1 tsp. vanilla
2 1/2 T. water
6 cups flour
2 tsp. cream of tartar
1 tsp. baking soda
1/2 tsp. salt

+ plus one cute little helper! 

DIRECTIONS: 
1. Preheat oven to 350 degrees
2. In medium bowl, mix 1/2 cup sugar and cinnamon; set aside. 
3. In large mixing bowl, combine butter and 2 1/2 cups sugar until light and fluffy.
4. Add eggs, vanilla, and water; beat until fluffy. 
5. Add flour, cream of tartar, baking soda, and salt, turning mixer on and off in quick bursts at low speed until flour is nearly blended in. Continue mixing at medium speed until well mixed.


 6. Make sure your helper approves of the dough

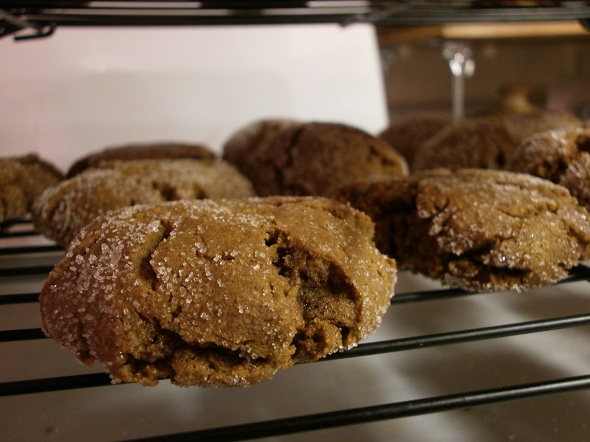
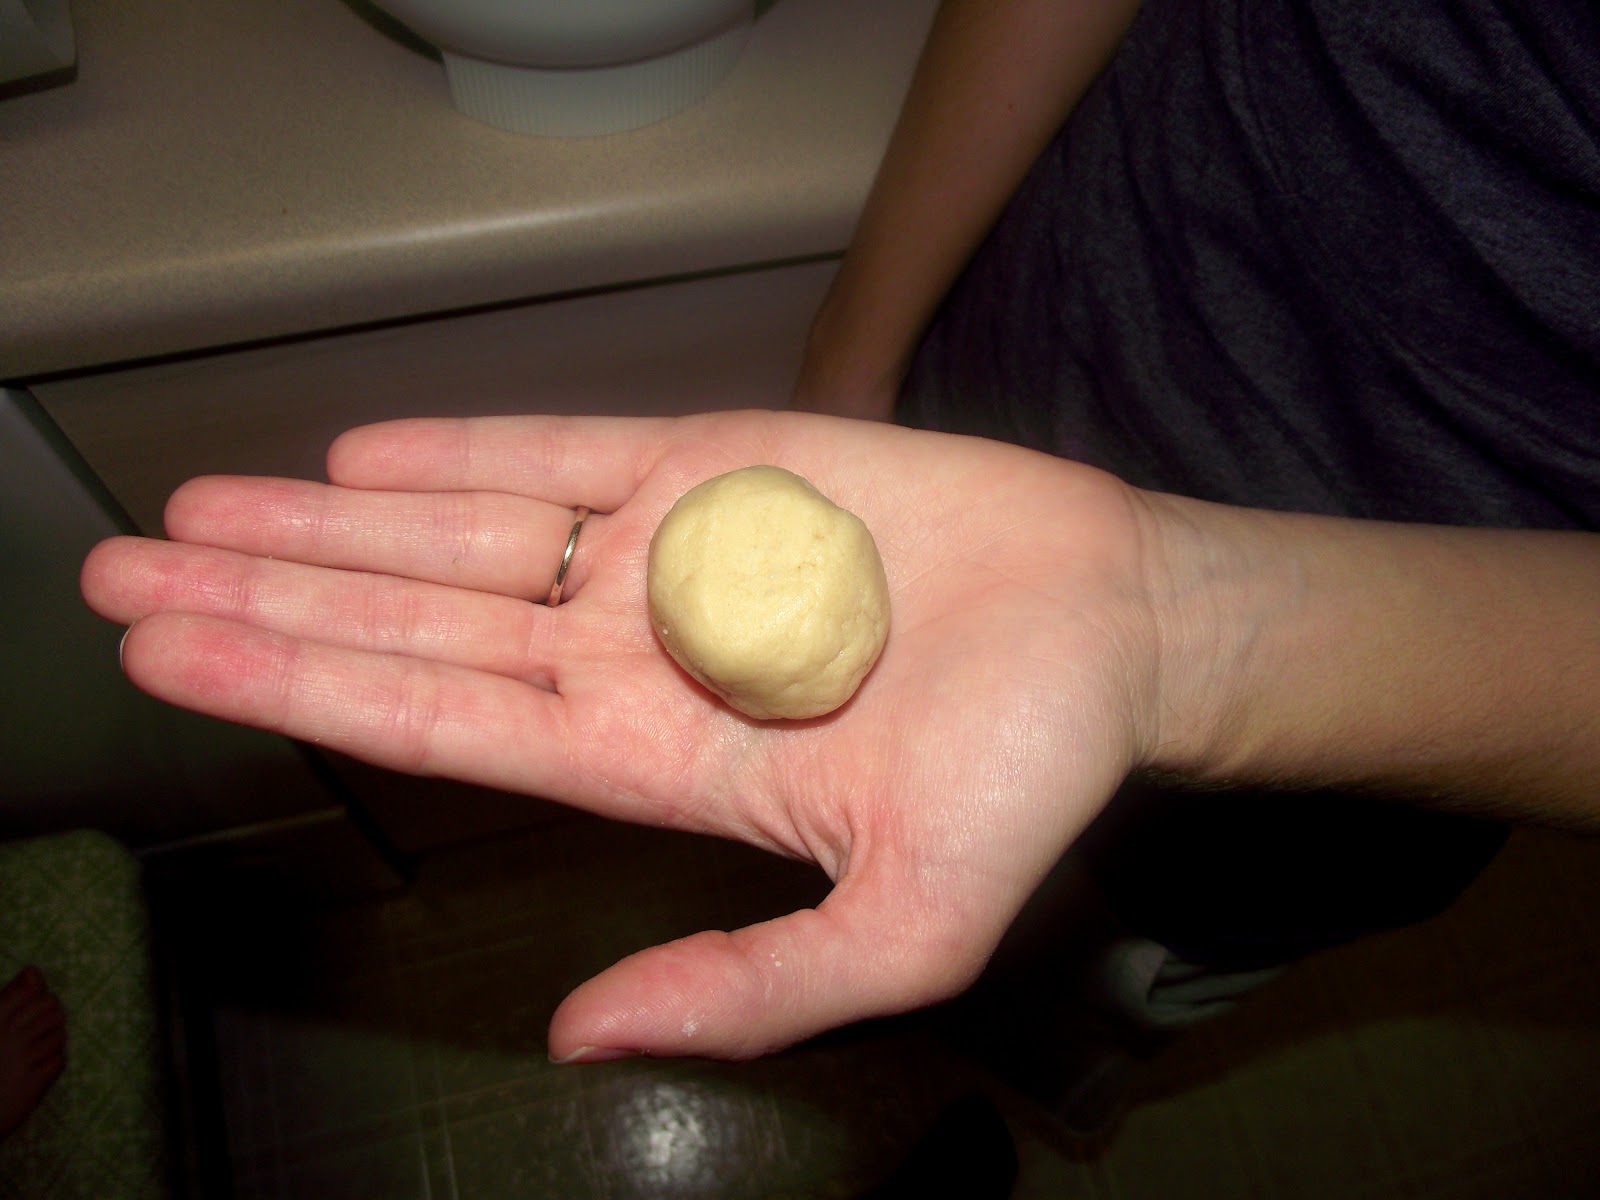
7. Shape dough by rounded tablespoonfuls & roll in cinnamon-sugar mixture. 
8. Place on cookie sheet lined with parchment paper and bake for 9 to 10 minutes or until golden brown. Makes 5 dozen 3-inch cookies.
And makes for one happy boy! 

Thank you for letting me share one of my favorite cookie recipes with you today!
I hope you all have a wonderful holiday season filled with lots of love, memories, and sugary treats. :)


Saturday, December 8, 2012

Day 8: Cookie Gifting Ideas

Ok so day 8 is a little late! I participated in my first craft sale on Saturday, and I was a little wiped out so I took the weekend to revive myself! But I have a few gift ideas for all those cookies your have been baking like crazy!

You can of course bake lots of cookies and make a cookie plate. If you plan on giving the plate I'd recommend a quick trip to your local Sally Ann, to find an inexpensive one off plate that would make the perfect setting to your cookies! Tins also work extremely well, and you can find them at the dollar store for... $1! Or if you're feeling crafty you can try this little trick, which I have posted before:
 
Up-cycled Christmas Cards! You can find the tutorial here if you'd like to know exactly how to make these sweet little boxes.

Or, if you feel that baking all those cookies yourself might be a little too much, then try gifting one of these cute little jars of almost baked goods. I say almost because the recipient will have to add a couple ingredients, and mix, spoon and bake themselves. But there sure is something about layers in a glass jar that would please just about anyone :)
sources here and here
For lots of delicious jar cookie recipes check out this page. I'm sure you can find something for everyone on your list!

There's a few ideas to get you started! And don't forget, you can still link-up any cookie recipes if you'd like to share some cookie love :)

Stay tuned, tomorrow we start the squares portion of the countdown!

Happy Baking
xox


Friday, December 7, 2012

Day 7: Cookie Link-Up


Week 1, said and done. Hard to believe there are only two full weeks left until Christmas! If you missed any of these delicious treats please jump back and have a peek. And if you have had a chance to try any of the recipes or if there is one you are dying to share by all means link it up below! I'm always looking for new recipes to try :)

I hope your December is going along smoothly, and that you have made a significant dent in your shopping (in my case crafting) list!

Thanks to Chrissy, for co-hosting the link-up along with me.

Thursday, December 6, 2012

Day 6: Candy Cane Ice Cream Sandwiches

So I spent most of the summer promising you a recipe for ice cream sandwiches. At least I made it in the same calendar year, haha. I thought I would take the festive favourite candy cane ice cream and make it into an even yummier treat!
The cookie part of the recipe comes from The Perfect Scoop, by David Lebovitz. Which has lots of delicious ice cream recipes as well as treats to go along with the creamy dessert.

Ingredients

1/2 cup unsalted butter, room temp.
1 cup sugar
1 large egg, room temp.
1 tsp vanilla extract
6 tbsp unsweetened cocoa powder (the recipe specifies Dutch-processed, but I just used what I had in the cupboard)
1 1/2 cups all-purpose flour
1 tsp baking powder
1/8 tsp salt


Directions

1. Preheat oven to 350°F, line two baking sheets with parchment paper.
2.  In stand mixer beat together butter and sugar until smooth. Beat in egg and vanilla.
3. In separate bowl, whisk together cocoa, flour, baking powder, and salt. Stir dry ingredients gradually into butter mixture, until completely incorporated.
4. Form dough into 1 1/2" balls, and on baking sheets flatten into 3" circles. (I chose to roll out the dough and cut smaller circles to make 'mini' sandwiches, you choose what works best for you!)
5. Bake for 20 minutes, rotate tray halfway through baking.
6. Once completely cooled scoop ice cream between two cookies, press together, and wrap. I wrapped mine in parchment paper.


I used Presidents Choice Candy Cane Ice Cream, but if that doesn't tickle your fancy then whatever ice cream you prefer would go wonderfully with these cookies, and they don't go soggy when stored with the ice cream. Delicious!

Be sure to stop by tomorrow and link-up any of the recipes you have tried, or another one you are bursting to share!

xox

Wednesday, December 5, 2012

Day 5: Cookie Dough Truffles

Last year one of my guest bakers happily shared a recipe for cookie dough bites, and as delicious as those looked I was a little scared to try them. When I was small my mother told me not to eat the raw cookie dough because it might make me sick. Whether or not it's true it has scared me away from raw cookie dough (for the most-part) ever since. 

This recipe is great just for that reason, it has the wonderful sweet taste of cookie dough, without raw egg or flour. Everything is safe as is, and the fact that these delicious little treats are coated in chocolate and topped with sprinkles just makes them irresistible!

From the Robin Hood Baking Hour, you can find it here. (yes that commercial with the cute little kids!)
   
Ingredients:
½ cup butter, softened
¾ cup brown sugar, packed
1 tsp pure vanilla extract
1 ¼ cups graham cracker crumbs
1 ½ cups quick cooking rolled oats
¼ tsp salt
1 can sweetened condensed milk
1 cup semi-sweet chocolate chips
1 ½ lbs Milk, White or Dark Chocolate Bar, melted


Directions:
1. Line baking sheets with Parchment Paper.
2. In a large bowl, using an electric mixer, cream butter and sugar together until light and fluffy, about 1-2 minutes. Stir in vanilla. Mix in graham cracker crumbs, oats and salt. Add sweetened condensed milk, mixing well. Stir in chocolate chips.
3. Freeze 30 minutes, or until dough is firm. Roll dough into 1” (2.5 cm) balls and freeze 30 minutes, or until firm.
4. Dip cookie dough balls into melted chocolate to cover, allowing excess chocolate to drip off. Return to baking sheet and chill in refrigerator or freezer until set. Serve cold.

Note:
To melt chocolate, bring 1-2” (2.5 cm-5 cm) of water to a boil in a medium saucepan. Place chocolate in heat proof bowl and place bowl over boiling water. Ensure bottom of bowl does not touch the water. Remove saucepan from heat. Let stand 3-5 minutes and stir.


I know, delicious, I told you. Now go make some! And you better come back tomorrow, I'll be sharing a shop update and of course Day 6!

Happy Baking!
xox

Tuesday, December 4, 2012

Day 4: German Vanille Kipferl with Chrissy

Hi, I am Chrissy from Whimsical Poppysmic and happy to be participating in Margot's Christmas Cookie Countdown this year. I am from Germany, so I am presenting you a typical German Christmas cookie. I am not sure they origin from Germany, but we have always been baking them ever since I can remember. So, have fun baking and enjoy these delicious little scones!
Vanille Kipferl
German Vanille Kipferl - Vanilla Scones

Ingredients
  • 200g / 7 oz  unsalted margarine
  • 100g / 3 1/2 oz sugar
  • 1/2 vanilla bean
  • 100g / 3 1/2 oz  unskinned almonds
  • 260g / 9 oz plain flour
  • 50g / 1 3/4 oz sugar
  • 8g / 1/4 oz vanilla sugar


Directions

Pre-heat oven to 375 ° F

Combine the unsalted margarine and the sugar until a smooth mixture results.
Cut the vanilla bean lengthwise, scratch out the vanilla core and add to the margarine.

Finely ground the almonds and knead with flour in the margarine mixture.

Form a ball and wrap in aluminum foil. Refrigerate for 1 hour.
Form the dough into a roll of 4 cm diameter and cut 2 cm slices from it. Form little scones and place them onto a baking tray lined with baking sheet.

Bake the vanilla scones for 10 minutes on the middle rung or until light brown.

Mix the vanilla sugar and the remaining sugar and sprinkle over the hot cookies after taking them out of the oven. Let them cool off on the baking tray, because they are very fragile while they are still hot and could break. To keep the vanilla scones fresh and crunchy put them into a cookie tin.

I found the recipe over here in case you are interested in finding even more yummy recipes!

Happy Baking!

Hugs,

Monday, December 3, 2012

Day 3: Chewy Bacon Butterscotch Cookies

I know what you are saying... Bacon? In a cookie? But believe me, it is delicious! This salty sweet combo is sure to please just about anyone. And since it is as simple as any old oatmeal cookie you really don't have a reason not to try it. ;)


The recipe comes the Robin Hood Baking Hour, and can be found here.

Ingredients:


Bacon:
10 bacon strips
⅓ cup brown sugar, packed
Cookie:

½ cup oats
2 cups all-purpose flour
1 tsp baking powder
½ tsp baking soda
½ tsp salt
1 cup butter, softened
¾ cup granulated sugar
¾ cup brown sugar, packed
2 eggs
1 tsp pure vanilla extract
1 cup butterscotch chips

Directions:

1. Bacon: Preheat oven to 350°F (180°C). Line a baking sheet with foil. Place rack on top of baking sheet. Place bacon in medium bowl. Toss with ⅓ cup brown sugar. Arrange bacon in a single layer on rack.
2. Sprinkle any sugar left in the bowl over the bacon. Bake for 20 minutes. Turn bacon over and bake for an additional 10-15 minutes until golden. Transfer to a cutting board, let cool and chop into small pieces.
3. Cookie: Line baking sheets with Parchment Paper.
4. In a food processor or blender, process oats until finely ground.
5. Transfer ground oats to a medium sized bowl and stir in flour, baking powder, baking soda and salt. Set aside.
6. In a separate bowl, using an electric mixer, beat butter and sugars until smooth. Add eggs and vanilla, beating until well combined. Add flour mixture, in small additions, until well mixed. Stir in butterscotch chips and bacon.
7. Place heaping tbsp of dough 2” apart on prepared baking sheets.
8. Bake in preheated oven 12-15 minutes, or until edges turn golden brown. For softer cookies, bake 12 minutes or for crispier cookies, bake 15 minutes. 

So was day three worth waiting for? I sure hope so! I'd love to hear your thoughts on this recipe, especially if you give it a try!

Happy Baking!
xox

Sunday, December 2, 2012

Day 2: Snickerdoodles with Vanessa

Today I've got a scrumptious Christmas recipe for you. Whether you're huddled by the fire or the AC this Christmas, there's nothing quite like enjoying a yummy cookie with a cup of tea. Snickerdoodles are one of my favourite cookies to make for three reasons:

1. Their name sounds silly, which is always a plus in my book.
2. They are totally delicious and very more-ish; and
3. They are super simple to make.

This recipe is one that I've adapted from a recipe in the Australian Woman's Weekly Cookie book. The original recipe can be found on page 112 of this book.
Ingredients
  • 250g butter, softened
  • 1 teaspoon vanilla extract
  • 1/2 cup firmly packed brown sugar
  • 1 cup caster sugar
  • 2 eggs
  • 2 3/4 cups plain flour
  • 1 teaspoon bicarbonate of soda
  • 1/2 teaspoon nutmeg
  • 2 teaspoons ground cinnamon
Directions

1. Beat butter, extract and sugars in a small bowl with an electric mixer until light and fluffy. Add the eggs, one at a time, beating until combined.

2. Stir in the sifted flour, soda, nutmeg and cinnamon. Cover and refrigerate for 30 minutes.

3. Preheat oven to 180 degrees Celsius for a normal oven or 160 degrees for a fan-forced oven. Grease an oven tray and line it with baking paper.

4. Roll level tablespoons of mixture into balls and place the balls about 7cm apart on the trays.

5. Bake for 12-15 minutes or until golden.

These spiced cookies are ideal for enjoying with a cup of tea or a glass of milk. They can also be wrapped in cellophane to make delicious gifts.
I hope that you enjoyed this recipe. For more festive cheer, please come and visit my blog, Nessbow. Merry Christmas!
----------------------------------------------------------
And Day 2 over and done with! It's amazing how fast this month is going already - and I have so much to do! Be sure to stop by tomorrow for another great recipe :) To see all the recipes, and recipes from last year visit the Cookie Countdown Page!
 

Saturday, December 1, 2012

Christmas Cookie Countdown Day 1: Tools of the Trade and Festive Shortbread Cookies

Hello! I know I have somewhat MIA in the last little while, things have been a little crazy around here trying to get ready for the craft sale (which is next week), making Christmas gifts and prepping for the Christmas Cookie Countdown! However, I have a super fantastic month planned for you, with lots of baked goods, some gifting ideas for those baked goods and some link-ups for you to share your favourites!

I thought I'd start out this year by talking about my go-to tools for all my baking adventures:
For most of my holiday baking I use my stand-mixer, but it is always good to have a sturdy bowl and a variety of wooden spoons on hand. The spatulas are great for making sure you get all the batter out of the bowl, unless you have someone who wants to lick out the bowl. A good quality whisk is a great tool for creaming butter and sugar, whipping cream, beating eggs, etc.The tool on the right is a cookie dough scoop, which I found ever so helpful last year to ensure my cookies were all roughly the same size. And if you are going to grease your trays or other bakeware then a kitchen spritzer such as this one is so handy, and parchment paper is a less greasy option! Lots of towels and cloths for cleaning up messes, and of course cute Christmasy tins to store all your delicious treats in!

There might be other tools, but these are my go to, and I realize I left out measuring spoons ans cups, but I kinda thought those were a given ;)

And on to our first recipe of the month: Festive Shortbread Cookies
Source Canadian Living Magazine, December 2006 can also be found on the website, here.

I thought we'd start out with a family friendly, simple recipe. These super cute cookies are equally tasty and come together really quickly. If you are looking for a fun family activity for this afternoon - this is it!

  
Ingredients
  • 3/4 cup all-purpose flour
  • 1/4 cup cornstarch
  • 1/2 cup butter, softened
  • 1/4 cup granulated sugar
  • 1/4 tsp vanilla
    Decorations:
  • 1/2 cup milk chocolate chips or semisweet chocolate chips
  • 1/4 tsp vegetable oil
  • Candy-coated chocolate pieces
  • Coloured sprinkles

Directions 

1. Heat oven to 300°F (150°C).

2. In mixing bowl, whisk flour with cornstarch. In large mixing bowl and using wooden spoon, beat butter with sugar until fluffy. Stir in vanilla. Stir in flour mixture, half at a time, to make smooth dough with no streaks.

3. On lightly floured work surface and using hands, roll dough into two 9-inch (23 cm) logs; cut each log into 9 pieces. Roll each piece into ball. Place, 2 inches (5 cm) apart, on prepared baking sheets.

4. Bake, 1 sheet at a time, in centre of oven until bottoms are golden brown, 30 to 35 minutes. Wearing oven mitts, transfer baking sheets to rack. Let cool for 2 minutes. Using metal spatula, transfer cookies to rack and let cool completely.

5. Line rimmed baking sheet with parchment paper; set aside. Pour enough water into small saucepan to come 1 inch (2.5 cm) up side. Heat on stove over medium heat until hot but not boiling. Remove from heat.
Place chocolate chips and oil in heatproof bowl. Wearing oven mitts, place bowl over hot water; stir until chocolate is melted and smooth. (Be careful not to get any water in chocolate or it will clump.) Move bowl to work surface.
Dip cookies, 1 at a time, halfway into chocolate, shaking gently over bowl to remove excess. Dip into desired decorations. Set on prepared baking sheet. Refrigerate until chocolate is firm and shiny, about 30 minutes.


And there you have it! Day 1 complete, be sure to check back tomorrow for another great recipe! And if you'd like to join in feel free to fill out this form. I'm still looking for squares and loaves :)


Happy Baking!
xox
 

Tuesday, April 17, 2012

Baking Challenge: Frying Pan Cookies & New Recipe!

So two weeks ago I shared this recipe, which was originally posted by Thursday:


So I finally had the chance to try these cookies out, and I tweaked the recipe just a little. Here's how my version went:

Ingredients:
1/2 cup butter
1 1/2 cup dates, chopped
1 cup brown sugar
2 eggs
1/4 tsp salt
1/2 tsp vanilla
1 1/2 Rice Krispies
1-2 cups of shredded coconut (I used unsweetened, up to you)

Directions:
Melt butter, and allow to cool slightly. Beat eggs well, combine with brown sugar and butter. Add dates. Cook this mixture over low heat, stirring frequently, for about 20 minutes. Remove from heat.

Allow mixture to cool slightly, add salt, vanilla and Rice Krispies.

Mixture must cool significantly before you can handle! Pour coconut into a low bowl, and line a baking sheet with parchment paper.

With greased hands roll teaspoon of mixture into a ball and then roll in coconut. Place on baking sheet and allow to cool completely. You will likely want to wash your hands and re-grease every 5 cookies or so, they can get very messy. Store in an airtight container, in the fridge for up to 1 week.

And here's the photo version of the recipe:


As you can see, I didn't actually make these in a frying pan. I chose to use a sauce pan. And I'm happy to report they are quite tasty! Please comment below if you try them, or if you have an interesting recipe you'd like me to try :)

As for our next project, this is what I'm looking at:
I'd love it if you'd join in! Check back in two weeks to see how I make out :)

xox


Tuesday, April 3, 2012

Baking Challenge: Frying Pan Cookies

So if you follow my blog at all, you know I love to spend time in the kitchen. I noticed recently that I haven't been baking and sharing as many recipes as I normally do, and then I came across this interested recipe on Thursday's Blog:
Source: My Girl Thursday
It seems she thrifted an old church cookbook, where there are often lots of interesting ingredients and the directions are usually lacking. Because I am fairly good at 'winging it' in the kitchen, I figured I would give this little gem a try. And what a better way to make a series than to offer up the challenges to you! So I encourage you to participate. When I complete and post this recipe I will add a link-up and you can share your version if you are interested. I would also be glad to have any suggestions. If you have an old recipe, or one that is a little obscure, please photograph it as above and e-mail it to me. I would love to add it to my challenge and try it out!

Who's going to be brave along with me?
xox

Saturday, December 24, 2011

Gingersnap Cookies


Gingersnap Cookies (I like these instead of cut-out gingerbread, partially because I'm lazy)
(gluten and nut free)

⅓ cup              unsalted butter, softened
1⅓ cup            granulated sugar
1                      egg
¼ cup              fancy molasses
2½ cups           gluten-free all purpose baking flour
1½ tsp             ground ginger
1 tsp                baking soda
1 tsp                ground cloves
1 tsp                ground cinnamon
Pinch               salt

In a large bowl beat butter with 1 cup of the sugar; beat in egg and molasses. In a separate bowl, whisk together baking flour, ginger, baking soda, cloves, cinnamon and salt; stir into butter mixture to form stiff dough.

Roll dough by level 1 tbsp into balls; roll in remaining sugar. Place, 2 inches apart, on parchment lined baking sheets; press to flatten slightly.
 

Bake in 350˚F oven until edges are light golden, about 12 minutes. Transfer to rack, let cool.

I actually didn’t use gluten-free flour, and I think because of that my cookies rose (my auto correct tried to tell me raised... you decide) more than they were supposed to. But as Reggie said, they still taste good, so no worries! But if you require gluten-free, this is a simple and tasty recipe! Day 24, oh my goodness we’re getting so close, I can almost see it! One more sleep! Sleep well everyone :)

xox

Friday, December 23, 2011

Sugar Cookies with Royal Ornamental Frosting

Doesn't that cookie look good! Head on over to Karen's blog, Hodgepodge Arty for the complete how-to on this cookie. I'm not a big fan of making cut-out cookies, so when Karen offered up this recipe I jumped on it!

Only two sleeps left, and... it snowed last night! It might not be a green Christmas afterall :)
xox

Thursday, December 22, 2011

Oatmeal Chocolate Chip Shortbread


Oatmeal Chocolate Chip Shortbread

1 cup               unsalted butter, softened
3 tbsp              each granulated sugar and packed brown sugar
¼ tsp               salt
½ tsp               vanilla
1¼ cup            all-purpose flour
¾ cup              quick-cooking (not instant) rolled oats
¼ cup              cornstarch
¾ cup              chocolate chips

In a bowl using a wooden spoon, cream together butter, granulated sugar, brown sugar and salt until light; stir in vanilla (I used my stand mixer, worked fine). Stir in flour, oats and cornstarch until just combined. Gently fold in chocolate chips.
Divide dough in half; place each on waxed paper and using paper as aid, roll into 9” log. Refrigerate until chilled, about 1 hour, or for up to 24 hours.
Using a serrated knife, cut each roll into18 pieces; place, about ½ inch apart, on parchment lined baking sheet. Bake in 275˚F oven until firm and bottoms are lightly browned, 40-45 minutes. Let cool on pan on racks.
I tried these when they were still warm, and I found that I preferred them once they had cooled completely. I also used large chocolate chips, because it was all I had. But I think it would work better with mini chips (or without would be good too!). 
And that is day 22, I can’t believe how close it is to Chirstmas! We finally have our tree up and decorated, and the presents are constantly multiplying underneath – I’ll share a photo soon! I hope your holiday baking is coming along :) If you'd like to know how to make your own goodie box, check the tutorial page above and click on the first one!

xox